College Confidential: Wrestling Your Dorm Room into Submission

Last year the National Retail Federation estimated that parents spent an average of $907 to outfit their “child’s” dorm room. Gone are the days of the plain Jane room with the Peter Gabriel poster and a few thrift store items tossed in for good measure (brick and board bookshelves, anyone?) These are the days of bed-in-a-bag, ergonomic desk chairs, and machines that magically have your coffee waiting when you roll out of bed for that 8 a.m. stats class.

OandRBlog-8-7-14-IM1.jpg

Whether you go the $900 route or the try the scaled-down version, setting up a college dorm room is an exercise in exactitude: what is really needed, what fits where, what works best, and how to make it all look good. Every minuscule dorm room comes with the basics--bed, desk, chair, dresser, closet--and then you’re pretty much on your own. That’s where the exactitude comes in.

OandRBlog-8-7-14-IM2.jpg

First do a little research on the dimensions of your room, what’s already there, and what’s prohibited. Why buy all those fairy lights if your Resident Assistant is just going to make you take them down? Make sure you double check what size sheets you need--dorm beds usually all require the extra-long twin variety.

Set a realistic budget, and don’t fall prey to thinking you need everything right away--better to go with the “less is more” philosophy for such a small space. Before you head off to Bed, Bath & Beyond with a giant list, shop at home first. Yes, you will need a desk lamp, but you also won’t need the one currently on your desk at home. Start looking around. What can you take from your current digs that will provide a little warmth from home and also save some cash?

Make contact with your roommate to ensure you’re not doubling up on small appliances, rugs, or shared accessories. If your college offers free printing, you may not even need to waste valuable dorm-room real estate on a printer.

Think of your room as geographically divided up into five tiny, distinct spaces:

  • sleep

  • study (read)

  • kitchen

  • work (computer)

  • grooming

Then focus on what items you need for each of those areas and how you can best organize and store them.

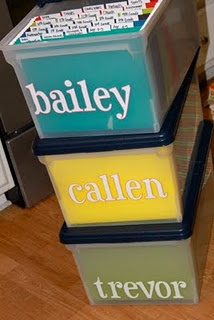
Use a hanging organizer either for shoes or to keep smaller items organized, labeled storage boxes with lids that will slide under your bed or stack to keep things out of the way, a shower caddy to cart your necessaries to the bathroom (don’t forget the flip-flops for in-shower use!), and maybe a book safe for valuables if needed. Use space-saving huggable hangers and cabinet shelves in your closet.

OandRBlog-8-7-14-IM3.jpg

Some colleges allow you to use blocks or bed risers to create valuable under-bed storage or living space in your room. Over 70 colleges now partner with Bedloft, which provides lofting services as well as microfridges and hangers for TVs.

The big retailers like Target and BB&B offer services like “buy here, pick up there” and also host shopping events after hours exclusively for college students. There’s a reason the back-to-college business is $50 million and growing! But does your trash can really have to match your duvet cover? Don’t fall prey to marketing. Remember: your room is tiny and the more stuff you cram in there, the less room for you.

You’re going to spend a lot of time over the next nine months in your dorm room, so make sure it’s comfortable, functional, and reflects who you are. Don’t forget you can always add things you need along the way once you see how your initial system is working. One thing is for certain: Target will never turn you away.

Happy Organizing!

Storing Schoolwork, Artistic Masterpieces, and Precious Papers... Oh My!

OandRBlog-6-12-14-IM1.jpg

You know the drill. The school year ends and your kids come home with the special things they’ve kept in the classroom all year; paintings, drawings, maps, awards, reports, essays, and projects. The really young ones want their creations hung up for the world to admire, and you can’t help but marvel as the years pass at how they’ve learned to sign their names, capture a flower, or draw a torso wearing a shirt instead of just a belly button.

The question is: what to do with it all?

Since we’re all about systems at Org&Relo, I’m going to offer up two--one soft, one hard--that might work for you to keep the kids’ paper tornado from taking over your house, one smiling stick figure at a time.

Soft Copy System

This solution is by far the least labor intensive--as well as being a space saver. The art or schoolwork comes through the door, gets photographed, gets stored in a file on your computer, and the hard copy gets tossed. No fuss, no muss! But if throwing away your mini Picasso’s work breaks your heart, you might consider the next option.

OandRBlog-6-12-14-IM2.jpg

 Hard Copy System

  • Designate a Temporary Holding Station

You can use a magazine box, a file folder, or a clear plastic box with a lid--whatever you choose, assign one for each child. For larger artwork, we recommend the underbed drawer from The Container Store. Then as the papers arrive during the year, you can decide with your child what’s special enough to keep and store it inside. (A good rule of thumb is that if it’s deserving enough to be in a frame or photo album, it stays.) This helps them choose what is valuable to them and also helps them learn how to let go of things that don’t have a gold star in their eyes.

  • Date... Everything!

If items aren’t dated, take a moment to add a date on the back of each paper. This will keep a chronology of your child’s progress and will make the pile easier to sort when it comes time to create a more permanent home.

  • Sort with Your Child’s Help

Once the end of the school year arrives and you’ve gathered the full nine months of your child’s precious papers, sit down with him or her and go through what you’ve kept during the year. Sometimes it’s easier to purge when the entire collection is in one place. Encourage your child to think about what’s important to keep and what he or she won’t miss if it’s added to the recycle bin.

  • Use a Binder and Sheet Protectors

Assign a large binder and insert the art into sheet protectors. Use tabs to label by year or semester. Since binders are bulky and take up valuable storage, you only want to have one per child (which also helps in the winnowing process). I’m not usually a fan of binders; some people like to jam them with random papers they don’t want to go through and then use them as an excuse to look organized. (You know who you are!)Keep in mind that this won’t be something that just gets shoved away in a dark closet. They are keepsakes that kids revisit to examine their growth and progress.

Once you’ve created this system, it’s easy to add to it as the papers arrive home. If that works, you could give up the holding station and just keep the binder stacked with empty sheet protectors.  You can create the same hard-copy system using a file box with folders for each child, but it doesn’t make it as easy for them to pull out and examine like a photo album.

Neither of these systems accounts for the inevitable 3-D artwork made from clay, papier-maché, or other mystery substances. Professional Organizer Peter Walsh has views on those: “If you or your child really want to hold on to the piece, make sure that it is displayed in a way that not only honors its importance but also protects it from dust and damage.  If a piece is not honored and respected then it has no place in your home--whether it's a science project or a family heirloom.”

Touché! I couldn’t agree more.

Happy Organizing!

A Little TLC for Your Kitchen - and My Guilty Secret.

I love food. I love cooking it, eating it, and sharing it. It naturally follows that I love my kitchen too. Even though it’s not quite the dream kitchen I would design if I found $50,000 lying around on the counter, it’s my comfort zone. That’s why every January, I give it the love it deserves by organizing it from--literally--soup to nuts.

I start by emptying out all the drawers and cleaning them. In my experience, cleanliness brings renewed energy into a space. Next, I group all the like items on the counter and look them over with a fresh eye. Is anything repeated? Are there utensils I never use? If so, I give them away or recycle them. Editing gadgets is a great stress reducer when you open your utensil drawer and don’t have to paw through it for five minutes looking for what you need.

I then reassemble my drawers with the clear Linus organizers from The Container Store, which I've also cleaned. There are shallow and deep ones, which I mix and match depending on need, but I always maintain the same depth in each individual drawer.  Organizational tools and supplies don’t have to be expensive or fancy--what’s important is to choose something you’re comfortable with and will use. I like the clear organizing trays because I can really see what’s in them.

OandRBlog-1-16-14-IM1.jpg

A junk drawer is essential to any kitchen, and it’s a great place to store those things you want at your fingertips but that never seem to have an obvious home--matches, pens, pencils, scissors, string, Post-it notes, etc. When I empty mine out and purge it in January I never know what I’m going to find in there--but I always know it will be interesting!  When I put it all back in, using the same see-through Linus organizers, I organize the contents in a different way to make sure I notice what’s in there.

Next, I do the same thing with the cupboards--a thorough clean and purge. It’s amazing how obvious the lesser used items become when everything’s out and similar things are grouped together. Why do I have so many mixing bowls? What about that grill pan I never seem to take out? And when the cupboards are empty, I think about how my current layout is working and how I can improve it when I put things back. Of course, I’m always repeating my mantra to myself: “Do I use it? Do I love it? Do I appreciate it?” This helps me make decisions without sentimentality getting in my way.

Once all that’s clean and reassembled, I move on to the food cupboards and the under the sink zone. Food items get edited with a ruthless eye, especially the classic “this looks cool, I bet I’ll use it!” that’s still sitting there a year later. Then I wipe down the shelves and only put back the items I know I will use, grouped by type. Ergonomics are key to organizing any space and I always order in a way that makes sense for my needs—healthy and most-used items at eye level, baking items all together, pet food on the bottom, etc. In my pantry, I use containers with labels to group smaller items together and especially love frosted totes in this zone. I create a typewritten label in all caps using a label maker for a clean and organized look.  

OandRBlog-1-16-14-IM2.jpg

I leave under the sink till last and am always stunned by how satisfying a thorough cleaning and edit of that generally neglected space is.

Okay. I know I've encouraged you not to double or triple up on gadgets (a client I worked with once had four blenders and wasn't willing to give any up), but I have a confession to make: I have three ice cream makers. My guilty secret is out! But here’s the thing: I love homemade ice cream, and I like to have more than one flavor at once. What’s a girl to do?

Happy Organizing!

Sheryl